

My hubby, Jim and I were talking about the new house during his Christmas break. He said something that took me by surprise. Usually, he is an even keeled dude, who doesn’t show a lot of excitement. Well, out of nowhere, Jim says, “Can you believe we designed this house ourselves? And it looks so good!” He said this with pride and joy beaming from his eyes. Y’all, we worked hard on this project and damn straight we’re proud of it.

In today’s post, I share details about our first on-site mechanical plan meeting with J Martin Builders. The vast majority of this meeting was focused on lighting, electrical and security/camera locations. We covered a few things related to plumbing and HVAC, but I’m sure we’ll discuss additional details later in the build. We’re getting to the fun stuff, including windows and finishes, so I’ll provide an update on those things too. This is a long post, so get a cup of tea and let’s get into it.
Crawl Space
The insulation crew came this week to lay some ground cover in the crawl space to minimize moisture. Although its cold outside the house, the ground in the crawl space remains warmer, so this time of year (January) it can amass quite a bit of moisture. The vapor barrier is installed as early as possible to lower the moisture content. As soon as we have power to the build site, they’ll add an exhaust fan in the space until the final insulation and vapor barrier is installed. During our walk-through, we’ll discuss areas we might want to add sound insulation.
Framing & Roof
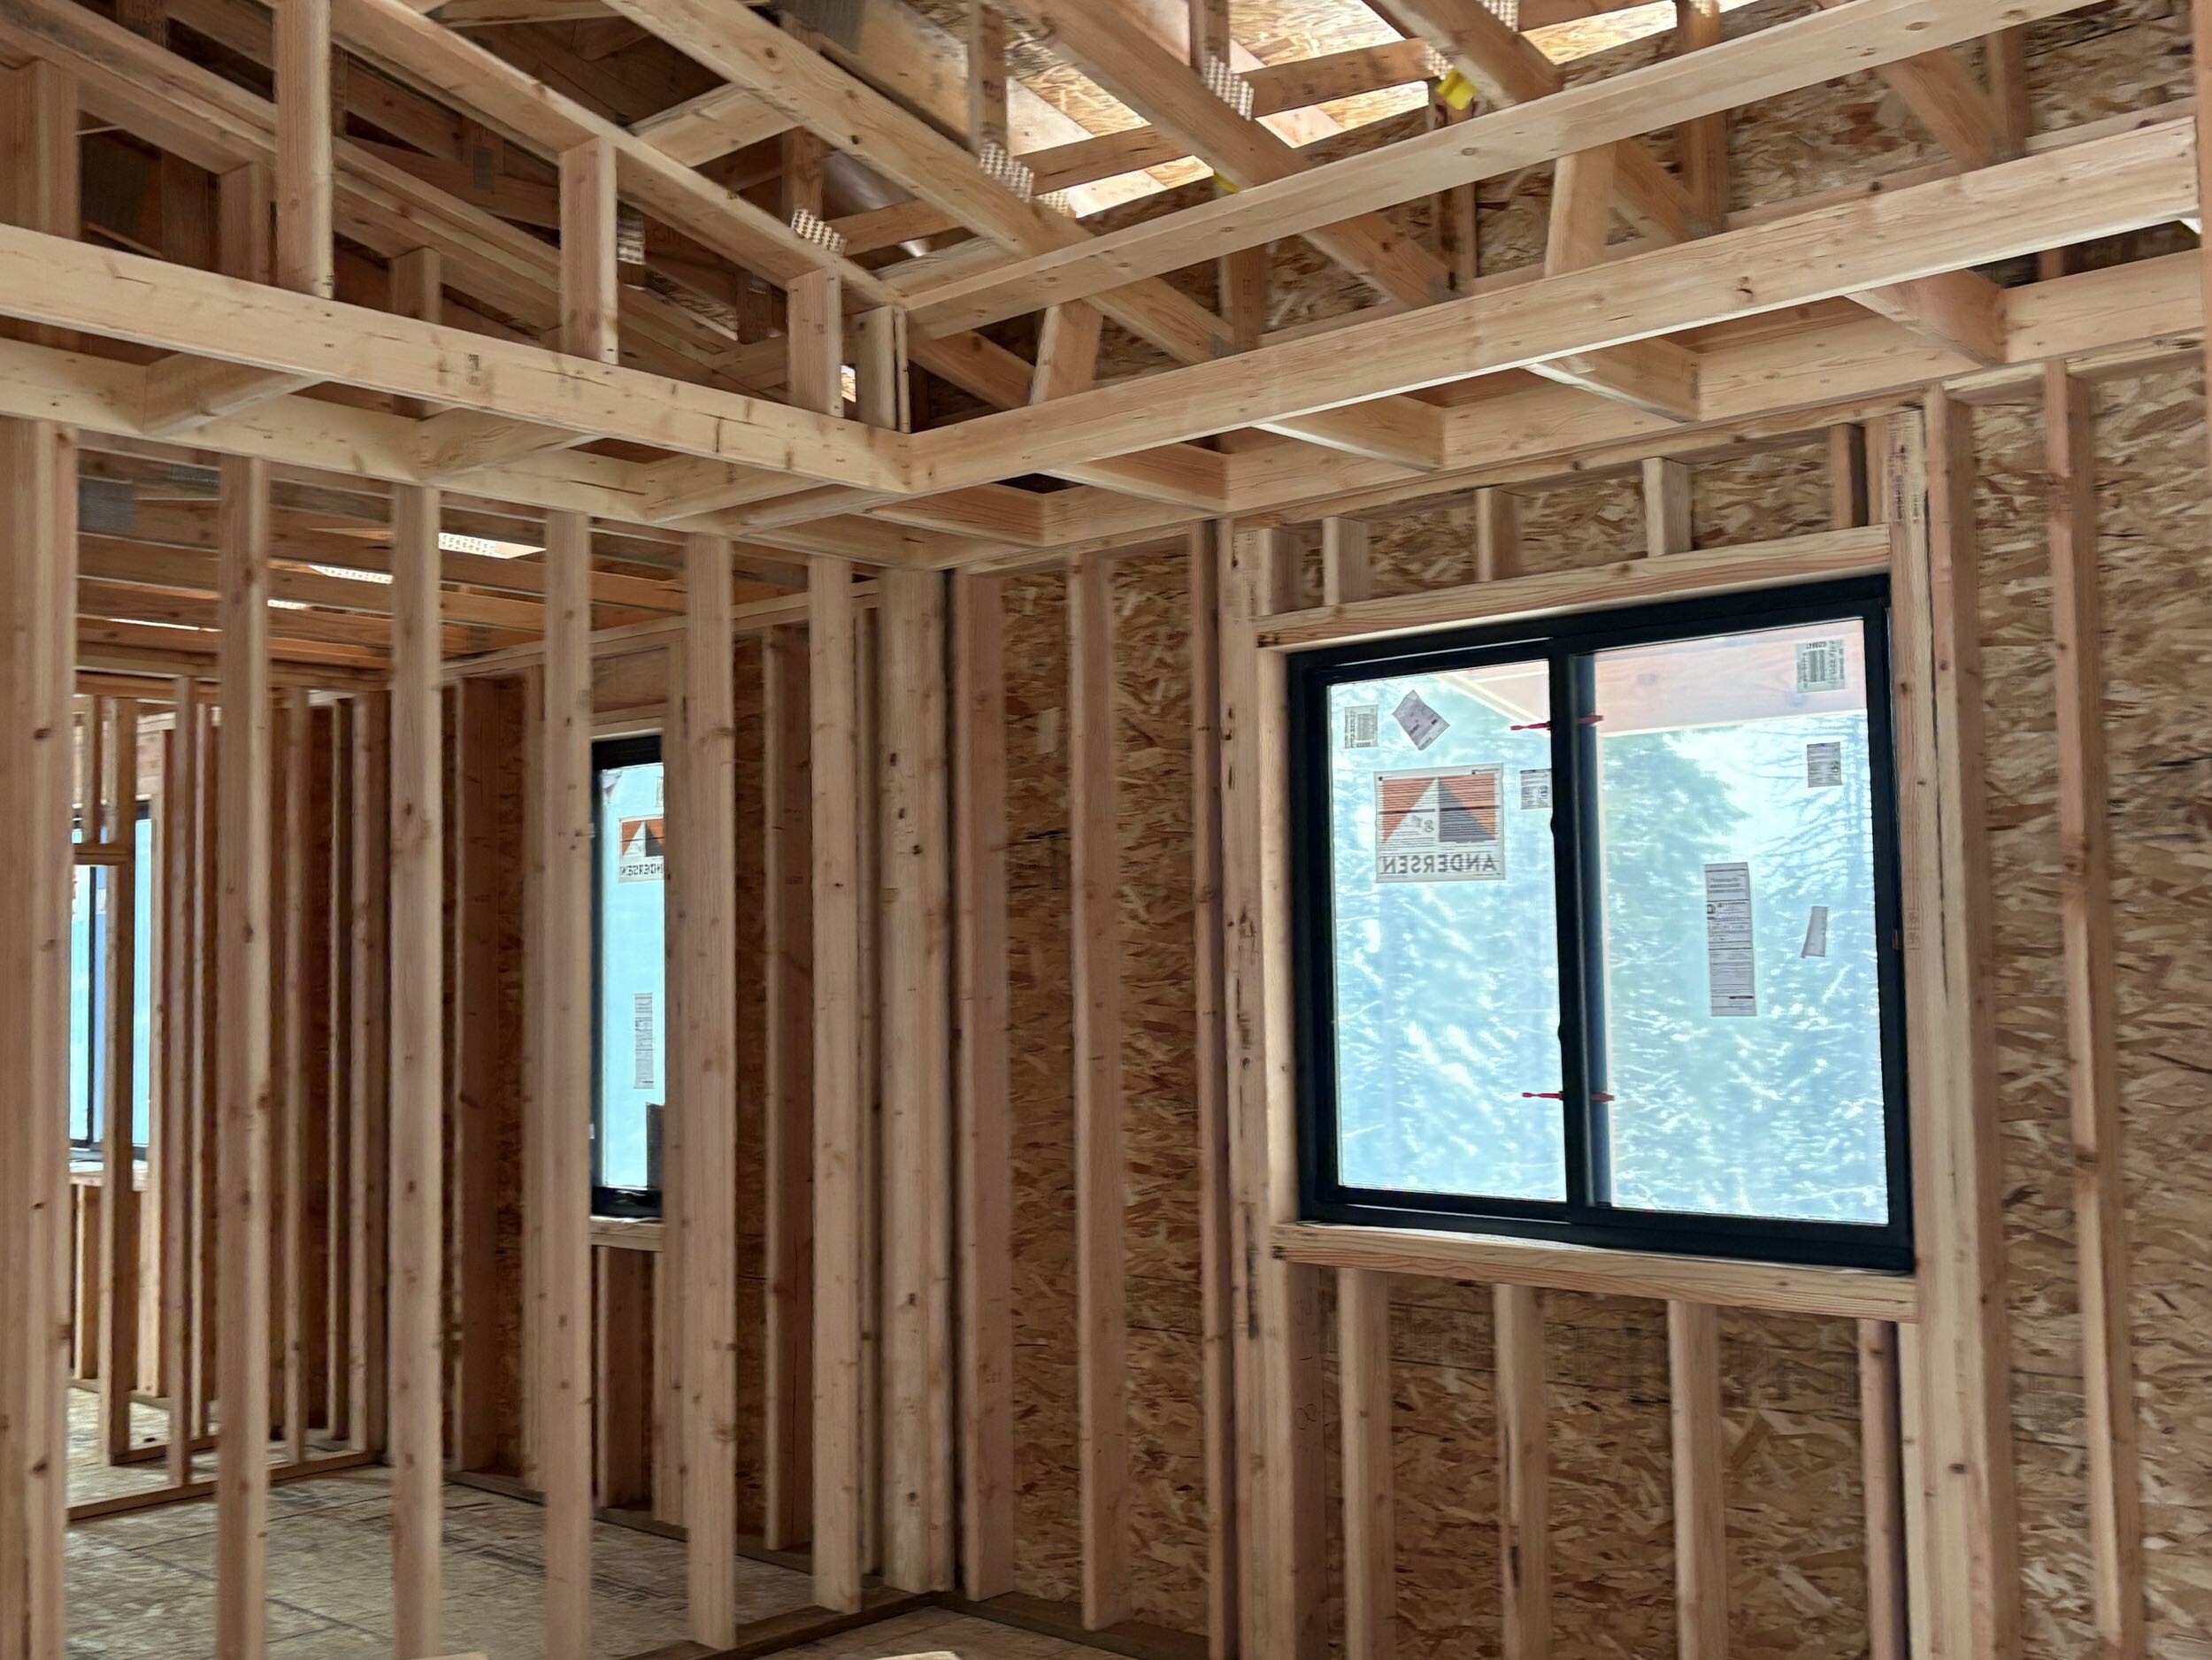
The roof was dried in with an underlayment over the weekend, which means the electricians will be able to get their inspection completed. Once the walk through is complete, the electricians will be able to finish their work later this month. The roofers will return to put down the asphalt shingles after the mechanical phase in done and the roof penetrations (primarily plumbing vents) are complete. All the framing looks great. The wood is solid and there were no signs of mildew or mold.
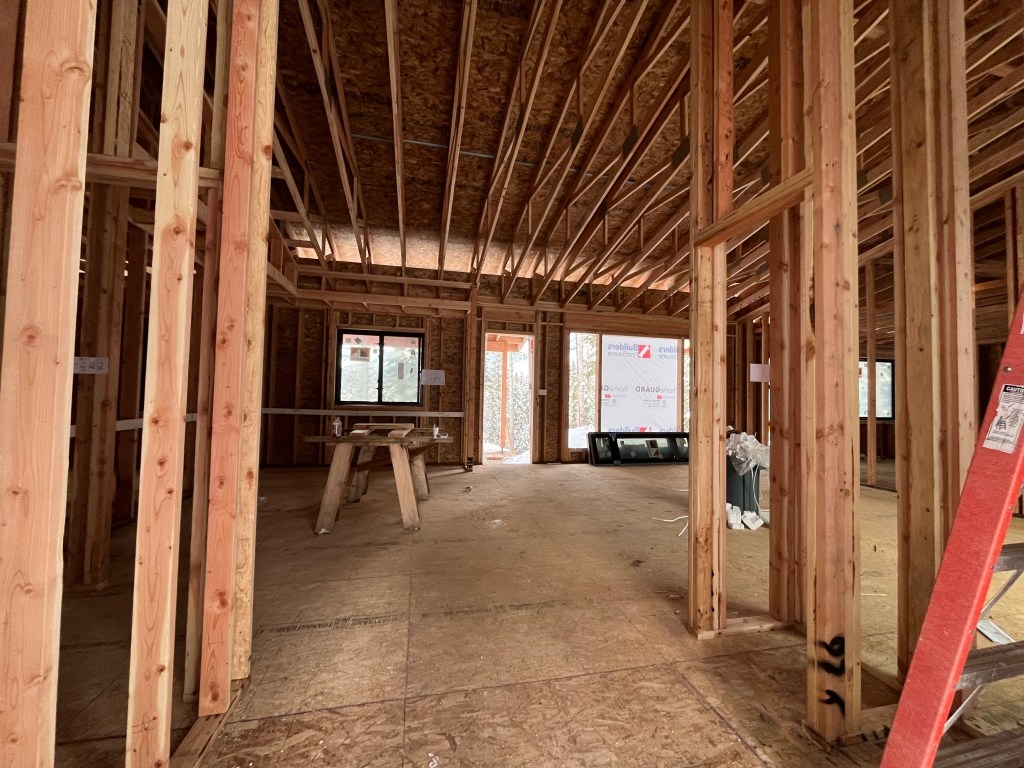
Before we talk about the mechanical planning meeting, I wanted to share why a framing inspection is an important step in the construction process. We are building this home across the country and can’t visit the build site as often as we would like. We hired a local independent inspector to ensure our custom home is built right. Here’s what you can expect during a framing inspection:
- Examination of Structural Framework: The inspector will check the quality and placement of the framing, including walls, floors, and roof structures. They’ll ensure that the framing is built according to the architectural plans and meets building codes.
- Material Quality: The inspector will assess the quality of the materials used for framing, such as wood, nails, and connectors. They’ll look for any defects or issues that could compromise the structural integrity of the home.
- Proper Installation: The inspector will verify that the framing components are installed correctly, including proper spacing, alignment, and secure fastening. They’ll also check for any signs of warping, twisting, or other issues with the wood.
- Safety Checks: The inspector will ensure that safety measures are in place, such as proper bracing, fire blocking, and the correct installation of anchor bolts and truss ties.
- Compliance with Plans: The inspector will compare the actual construction with the architectural plans to ensure everything is being built as designed. Any deviations or discrepancies will be noted and addressed.
- Identification of Issues: If any issues are found, the inspector will provide a detailed report with recommendations for corrections. This helps to address problems early on and avoid costly repairs later.
Overall, the framing inspection is crucial for ensuring the structural integrity and safety of your new home. It provides peace of mind that the construction is progressing correctly and according to plan. Consult your builder and framing contractor for additional details for your project.
Mechanical Planning
Some folks call this a hard hat tour, which loosely refers to everything that happens between the framing and the insulation of the home. Think of all the stuff that is installed in the walls that would be difficult to get to and correct later. You know, the guts – all the wiring, plumbing, ductwork, etc. We don’t expect any surprises, as our construction manager, John provides weekly updates, which includes progress reports with photos. Our builder, Jason also has monthly build meetings to discuss budget, build overviews, and any delays or issues. We’re thrilled to have no issues at present. It’s really helpful to have regular updates and explanations of work being completed in the home.
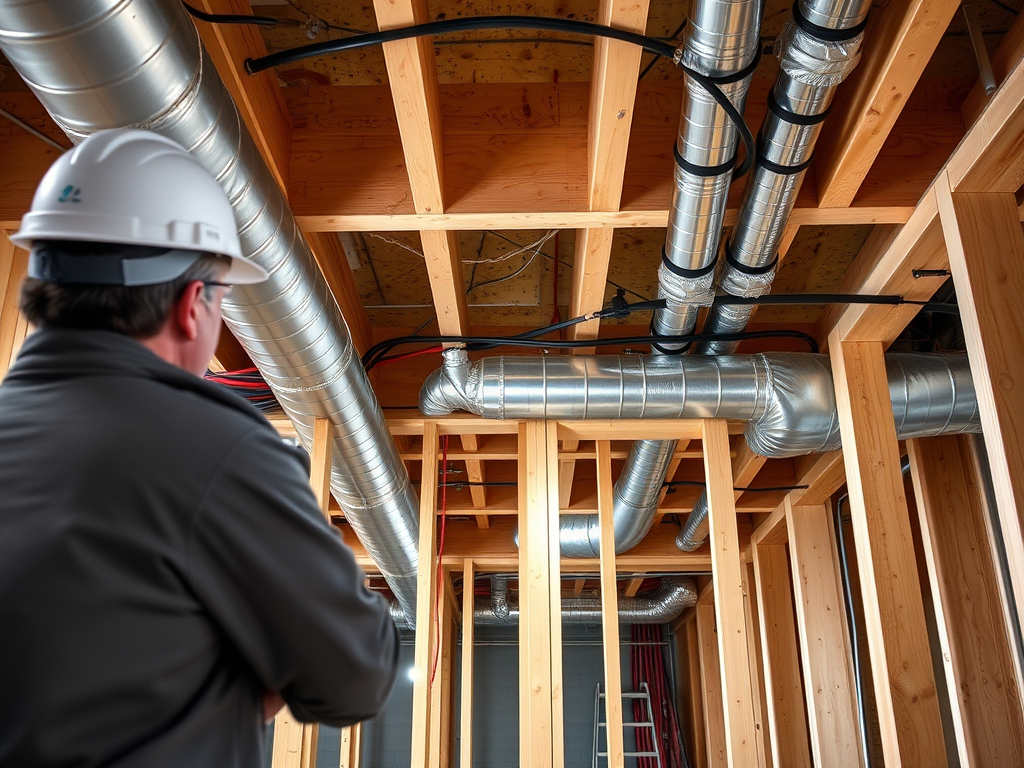
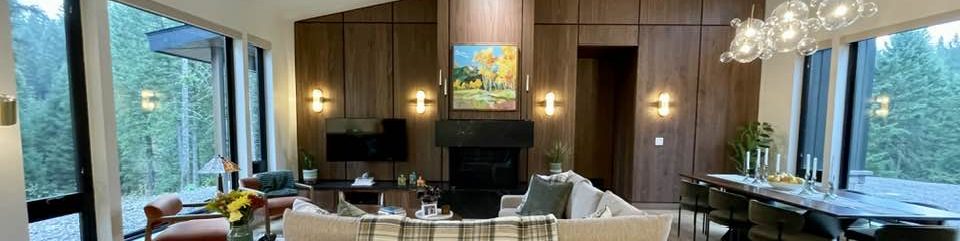
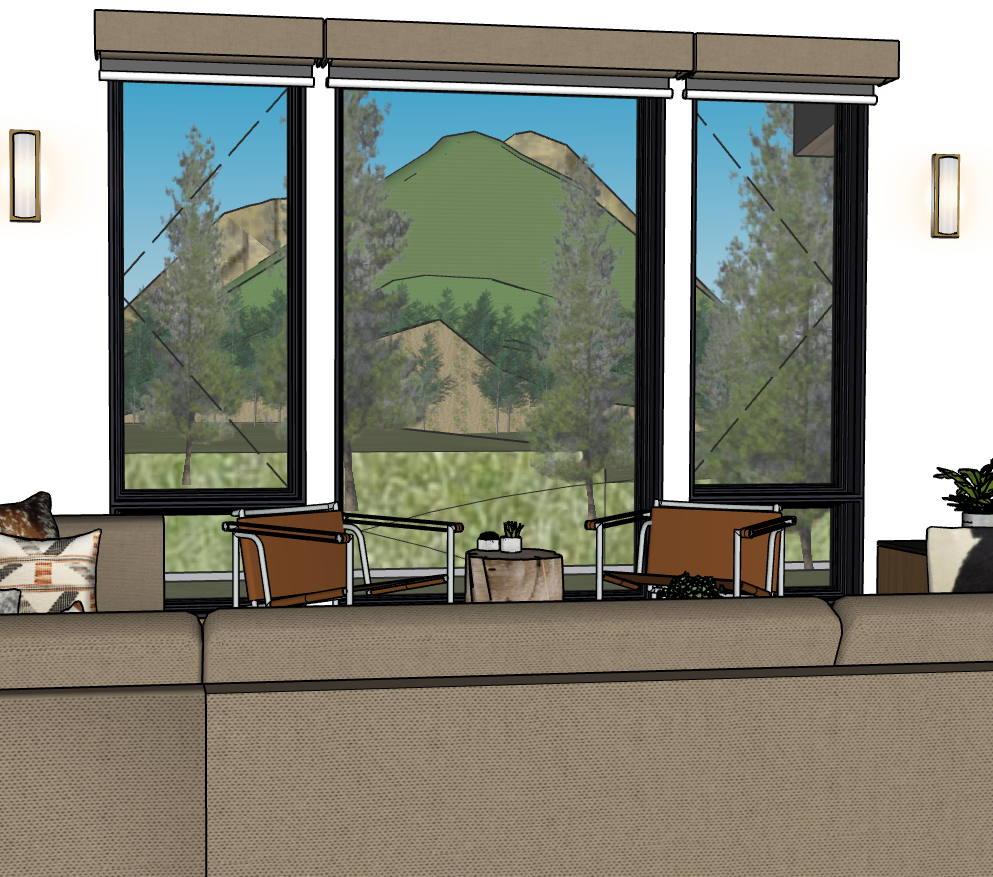
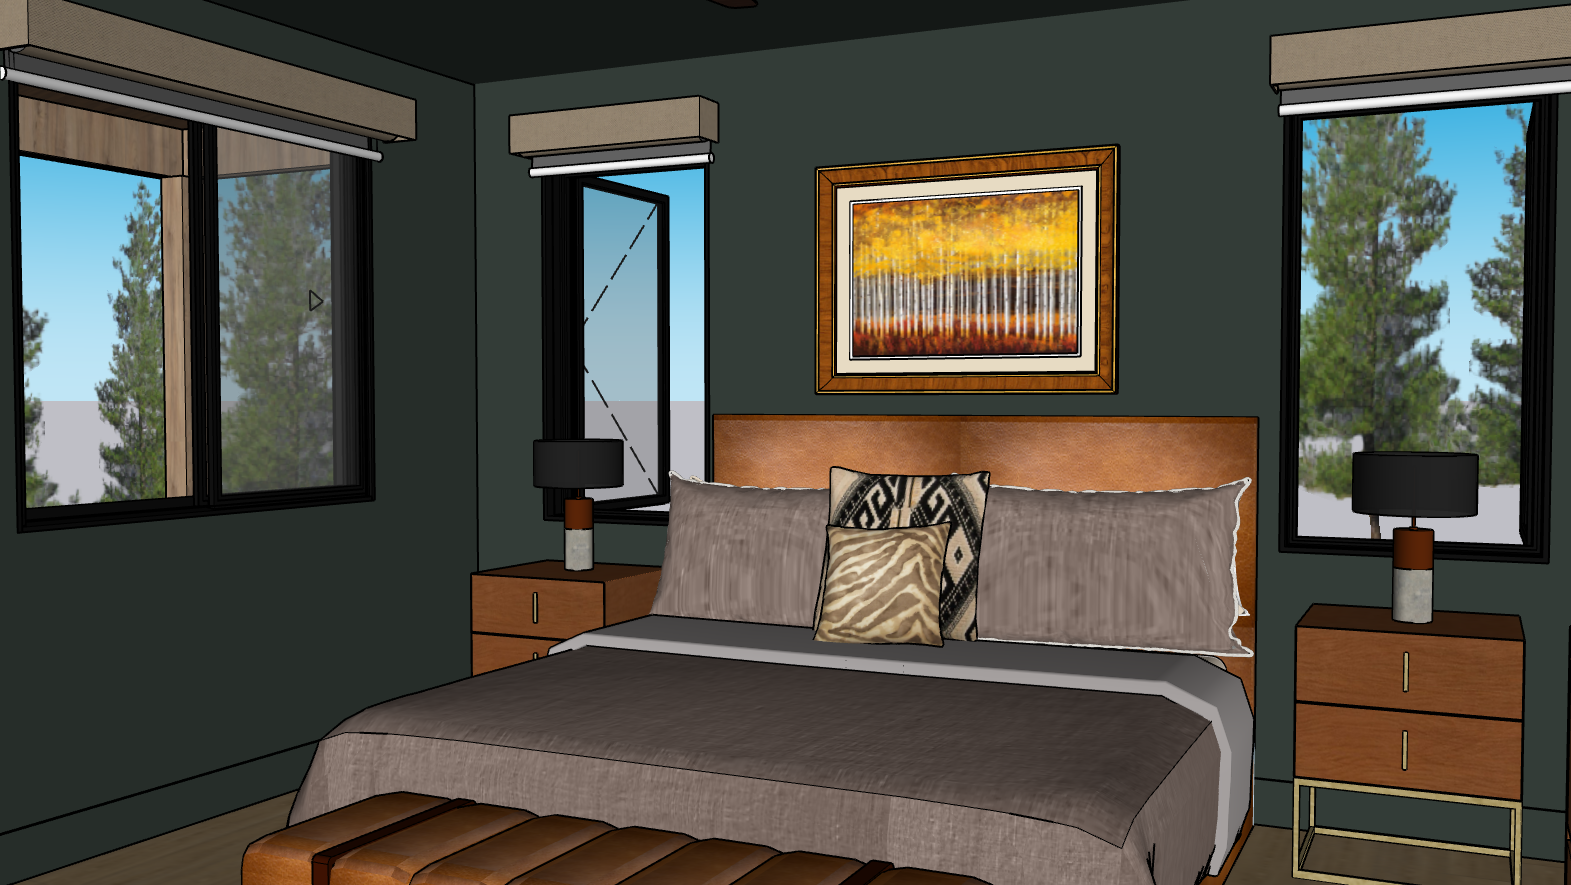
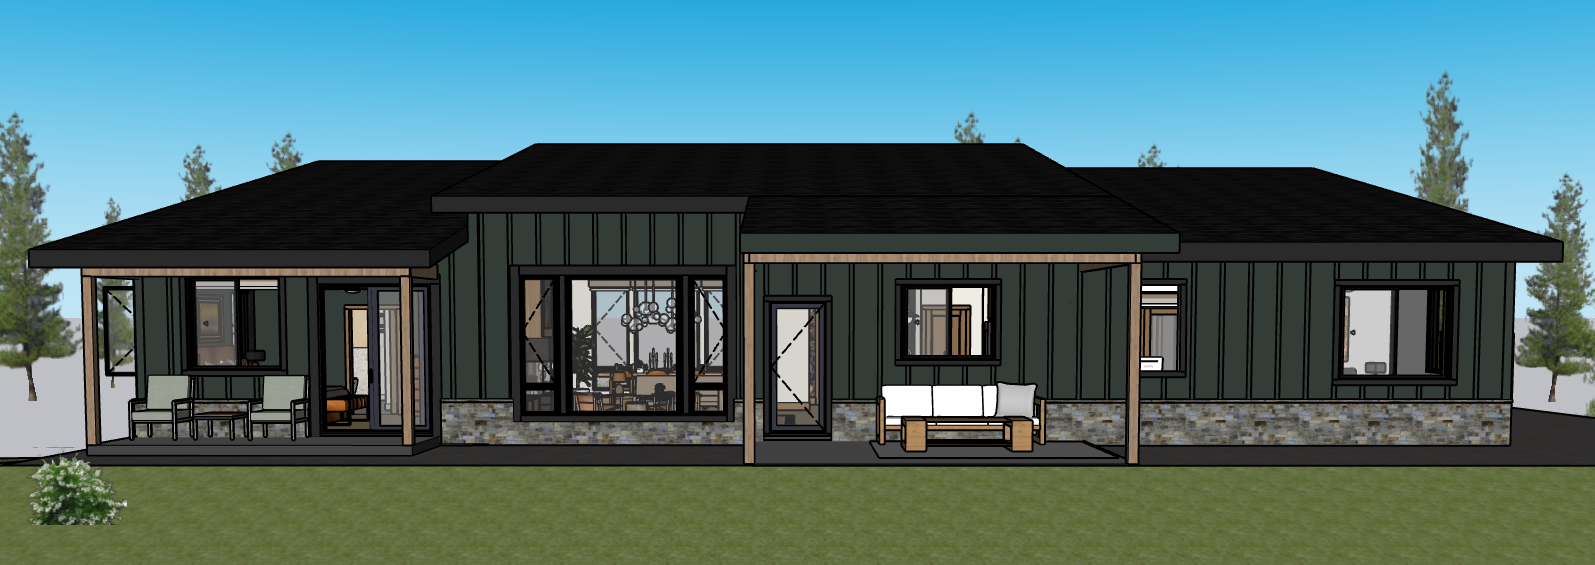
During this walk through, we focused mainly on electrical issues, like lighting and switch placement. Electrical is just one example of the “guts” in a new home. We’ve thought a lot about these details, everything from all the switches to the electrical panel location. For example, our lighting plan (LayOut/SketchUp) shows the type, location, switch placement, dimmers, three-way switches, etc. for all our spaces. We have a plan for all the rooms, but here’s the plan for the great room area:

Lighting
I love our “Soap Bubble” dining room light! I found it a few years ago and it looks fantastic in our SketchUp model. Our Interior Design partner, Joni Stoll Design is helping ensure this light is the right size and it’s located in the right spot. It helps to see choices like these and others in the 3d rendering. This light was on the pricey end for us, but most of our other fixtures have been affordable. If you’re creative you can find some awesome, affordable lighting fixtures and stay on budget. Amazon and Wayfair are good resources for finding bargains.


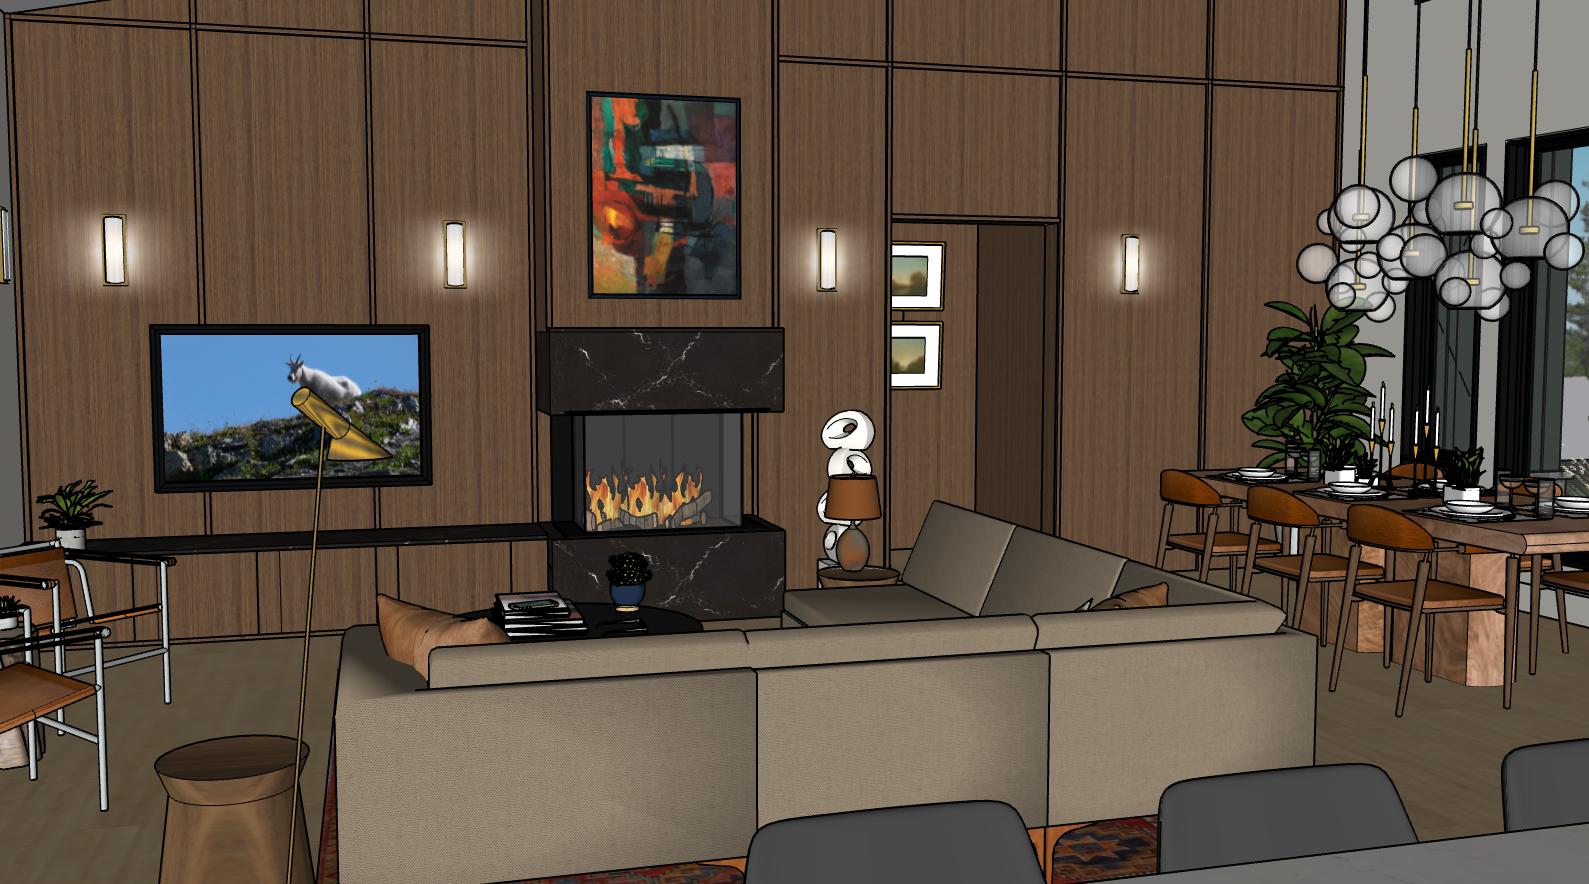
Choosing and placing your lighting fixtures is critical to a successful room design. You’ll want to consider everything from its color to the lighting’s purpose or function. I recommend a mix of warm ambient, as well as task and accent lighting for a living room. For your kitchen and office consider a cool bright light suited for everyday tasks in those rooms. Your bathrooms should provide cool bright lighting around the mirror and softer ambient lighting throughout. Bedrooms should be a cozy mix of warm ambient and accent lighting. We are layering the types and levels of lighting to include different fixtures. It is best if these fixtures sit at different levels, i.e., eye level when standing and sitting, as well as higher on walls or focal points.
See my post about lighting below for more information:
Our building team had the electrician’s initial plan, so during the walk through compared that plan to our lighting plan and tweaked some of the lighting. For example, we moved two of the living room sconces to a guest bedroom and we eliminated one of the sconces flanking the primary bathroom mirrors. We also discussed placement of all the switches, 3-way switches, and dimmers. John, our construction manager placed notated cards where the electrician recommended switches, and we tweaked as necessary. You’ll want to make sure switches are not in an awkward location and are functional for everyday living. For example, don’t put switches behind doors.
Choosing the right lighting for your home is important for creating the desired ambiance and functionality. Here are some additional things to consider:
- Natural Light: Take advantage of natural light during the day and consider how it impacts the room’s lighting needs.
- Fixture Style: Match the lighting fixtures to the room’s decor style. Whether it’s modern, traditional, industrial, or rustic, the right fixture enhances the aesthetic.
- Light Bulb Type and Color Temperature: LEDs are energy-efficient and long-lasting. Warm light creates a cozy and relaxing atmosphere, great for living spaces. Cool light is best for task-oriented areas like the kitchen or office.
- Dimmability: Consider dimmable lights to control the brightness and create different moods.
- Layered Lighting: Combine different types of lighting (ambient, task, accent) to add depth and versatility to the room.
- Placement: Pay attention to the placement of lights to avoid glare and shadows. For example, under-cabinet lighting in the kitchen or bedside lamps in the bedroom.
- Energy Efficiency: Look for energy-efficient options to save on electricity bills and reduce your carbon footprint.
- Budget: Determine your budget and find lighting options that fit within it without compromising on quality and style.
- Personal Preference: Ultimately, choose lighting that makes you feel comfortable and suits your personal taste.
Good interior lighting can transform your home in remarkable ways:
- Enhances Ambiance: Proper lighting creates the mood and atmosphere you want. It can make your space feel cozy, elegant, vibrant, or tranquil.
- Improves Functionality: Task lighting in areas like the kitchen, office, or study improves functionality by providing focused illumination where you need it most.
- Highlights Decor: It accentuates architectural features, artwork, and décor pieces, making them stand out.
- Boosts Well-being: Natural and well-designed artificial lighting positively impact your mood, productivity, and overall well-being. It can help regulate sleep patterns and reduce eye strain.
- Increases Space Perception: Strategically placed lighting can make small spaces appear larger and more open.
- Adds Value: Good lighting design can increase your home’s aesthetic appeal and resale value.
Consult your builder and interior designer for additional details for your project.
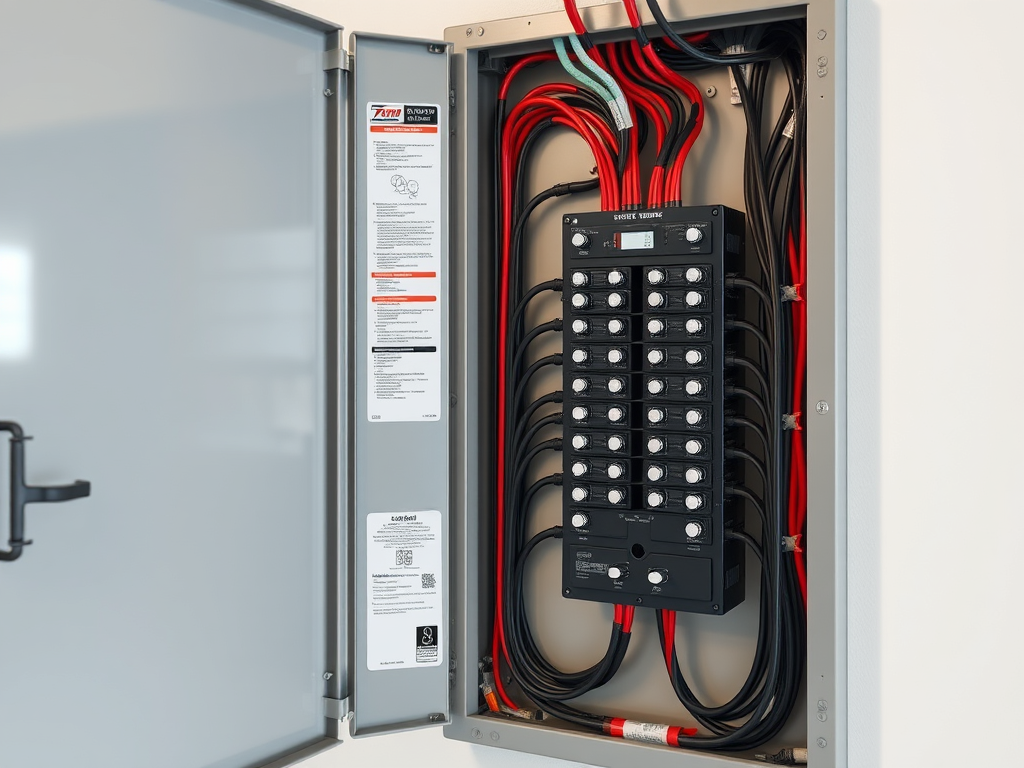
Electrical
Our Build Manager, John met with the county electric company this week to walk through the requirements for getting power to the house. What we all thought was a vault is actually a “J-box,” which is basically a power strip to allow power to continue down the property. That means we’re going to need to order and set a concrete vault for the transformer. Now that we have a plan for electrical and a viable well, Glacier Construction will start trenching for the various utilities next week. The excavator will trench for water, electrical, and septic lines.
Fun Fact: While many utilities struggle to find a clean, reliable, and affordable power supply, we’ll enjoy the benefits of hydropower from a dam. These means we have one of the least carbon-intensive electric grids, and our community enjoys some of the most affordable electric rates in the country.
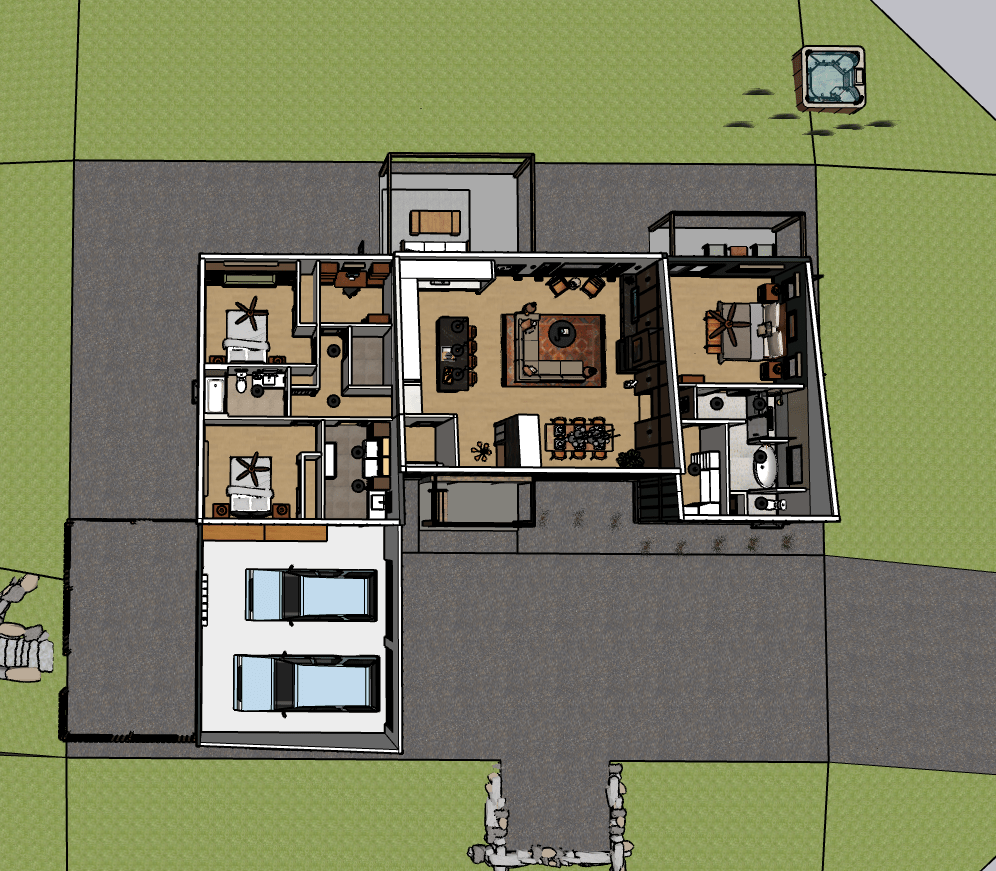
We designed our floorplan to have a mechanical/storage room located in the middle of the house. Some mechanical items, like HVAC will be in our conditioned crawl space. Y’all there are a lot of benefits to a crawl space. Access to the crawlspace is in our mechanical/storage room. We’ll have plenty of space for the electrical panel, hot water heater, water filtration system, and anything else required for our house. The room is big enough to fit all these things, plus additional storage for a vacuum, brooms, etc. You can see it on the left side between the laundry/mudroom and office spaces below:
When planning the electrical system for your new home, there are several key factors to consider ensuring safety, functionality, and futureproofing. Here are things to consider when planning the electrical details for your new build:
1. Electrical Code Compliance
- Local Regulations: Ensure that your electrical system complies with local building codes and regulations. This will not only guarantee safety but also prevent legal issues.
- Permits and Inspections: Obtain the necessary permits and schedule inspections to verify that all electrical work is up to standard.
2. Load Calculation
- Power Requirements: Calculate the total electrical load to determine the capacity of your service panel. Consider high-power appliances like HVAC systems, electric stoves, and water heaters.
- Circuit Distribution: Plan the distribution of circuits to avoid overloading and ensure that different areas of your home have sufficient power.
3. Outlet Placement
- Accessibility: Strategically place outlets in convenient locations, such as kitchen counters, living rooms, bedrooms, and bathrooms.
- Specialty Outlets: Install outlets with USB ports, GFCI (Ground Fault Circuit Interrupter) outlets in wet areas, and dedicated circuits for heavy-duty appliances.
4. Lighting Design
- Layered Lighting: Use a combination of ambient, task, and accent lighting to create a well-lit, functional, and aesthetically pleasing environment.
- Energy Efficiency: Opt for LED lighting and consider smart lighting systems for energy savings and convenience.
5. Futureproofing
- Smart Home Integration: Plan for smart home devices and automation systems, such as smart thermostats, security systems, and lighting controls.
- Extra Conduits: Install extra conduits and outlets for future upgrades or additions, like home offices or entertainment systems.
6. Safety Features
- Surge Protection: Install surge protectors to safeguard against power surges.
- Smoke and Carbon Monoxide Detectors: Ensure that these life-saving devices are wired into your electrical system.
7. Energy Management
- Renewable Energy: Consider incorporating renewable energy sources like solar panels.
- Energy Monitoring: Use energy monitoring systems to track usage and identify potential savings.
8. Professional Help
- Qualified Electrician: Hire a licensed and experienced electrician to design and install your electrical system.
- Collaboration: Work closely with your electrician, builder, and other professionals to ensure a seamless integration of the electrical system into your home design.
By carefully planning and considering these aspects, you can create a safe, efficient, and future-ready electrical system for your new home. Once the work is complete and before insulation is installed our inspector will check the following:
- Inspection of wiring: Ensuring all wiring is installed correctly and safely.
- Testing of outlets and switches: Making sure they are functional and placed correctly.
- Review of electrical panel: Ensuring it’s properly installed and meets code requirements.
- Testing of structured wiring and any smart home systems: Ensuring they are set up correctly for automation and connectivity.
Consult your builder and electrician for additional details for your project.
Security and Cameras
We share our property with lots of wildlife, so we’re hoping to see lots of critters on our home and trail cameras. Our valley is nestled within the Crown of the Continent Ecosystem, one of the most pristine landscapes in the lower 48 states. Large wildlife, including bears, wolves, and elk, roam the peaks, valleys, and rivers, navigating public and private lands to find food, water, and shelter. The area is an important migration corridor for thousands of birds gathering on wetlands that speckle the landscape, and our rivers are world famous for the bull trout and westslope cutthroat trout that migrate in our glacier-fed icy-cold waters.

Although, I’m not worried about security, Jim wants to install a self-monitoring system, including cameras on the outside of the house. We are considering Ring systems for these purposes. We are both really excited about the trail cameras. Once we’re in the house, we’ll walk the property in winter looking for game trails. Once located we’ll place cameras on the game trails to catch glimpses of theses critters on our property.

When it comes to wiring security systems and cameras for a new home construction, there are several options to consider. Here are some key points to keep in mind:
1. Professional Installation vs. DIY
- Professional Installation: Companies like ADT, SimpliSafe, and Vivint offer professional installation services, ensuring that everything is set up correctly and efficiently. This can be especially beneficial if you’re not comfortable with DIY projects.
- DIY Installation: If you prefer a hands-on approach, systems like SimpliSafe offer DIY options that are easy to install and customize.
2. Wired vs. Wireless Systems
- Wired Systems: Wired security cameras, such as those from Lorex and Annke, are connected via Ethernet lines, providing a stable connection and high-quality video footage. These systems often require professional installation but offer reliable performance.
- Wireless Systems: Wireless systems, like those from SimpliSafe and Frontpoint, offer more flexibility in terms of camera placement and are easier to install without the need for extensive wiring.
3. Smart Home Integration
- Many modern security systems integrate seamlessly with smart home ecosystems, allowing you to control your security cameras, lights, and other devices through a single app. Vivint and ADT are known for their smart home integration capabilities.
4. Monitoring Services
- 24/7 Monitoring: Companies like ADT and Vivint offer 24/7 professional monitoring services, providing peace of mind that your home is always being watched.
- Self-Monitoring: Some systems, like SimpliSafe, offer self-monitoring options, where you can keep an eye on your home through your smartphone.
5. Customization and Features
- Customization: New construction allows you to customize your security system from the ground up. You can choose the number and type of cameras, sensors, and other components based on your specific needs.
- Features: Look for features like night vision, motion detection, two-way audio, and high-resolution video to ensure comprehensive coverage of your property.
An inspector would look at the following:
- Installation of security systems: Ensuring cameras and alarms are placed correctly.
- Testing of cameras: Making sure they have a clear view and are functioning properly.
- Review of access control systems: Ensuring locks and keypads are installed and working.
- Testing of monitoring systems: Ensuring they are connected and can be monitored remotely.
As you’ve read, a custom home mechanical walkthrough is a comprehensive process where you’ll review and inspect various systems in your home to ensure everything is installed correctly and functioning properly.
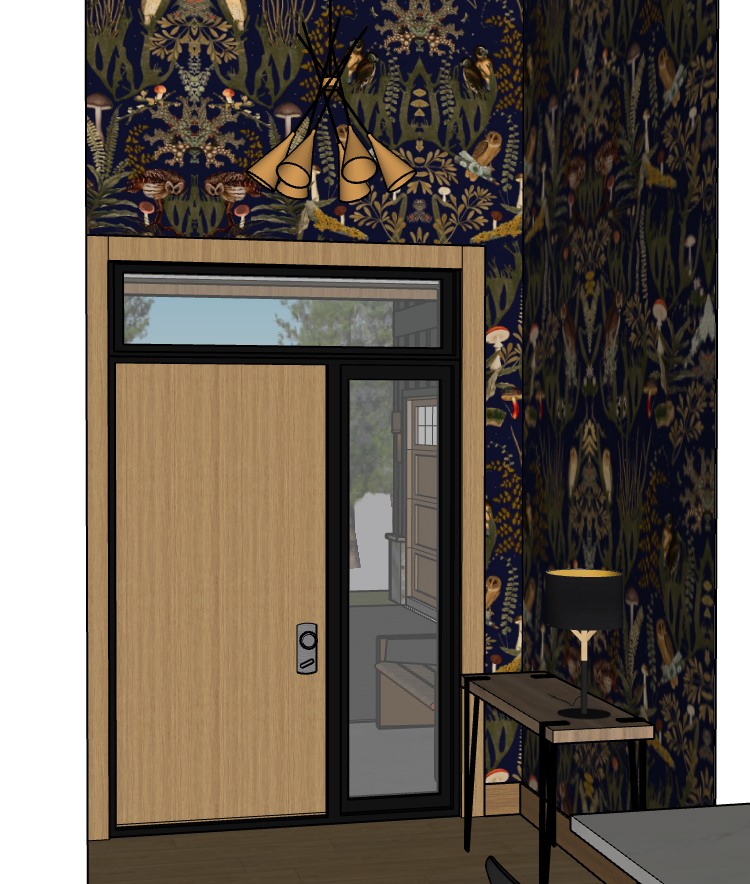
Windows
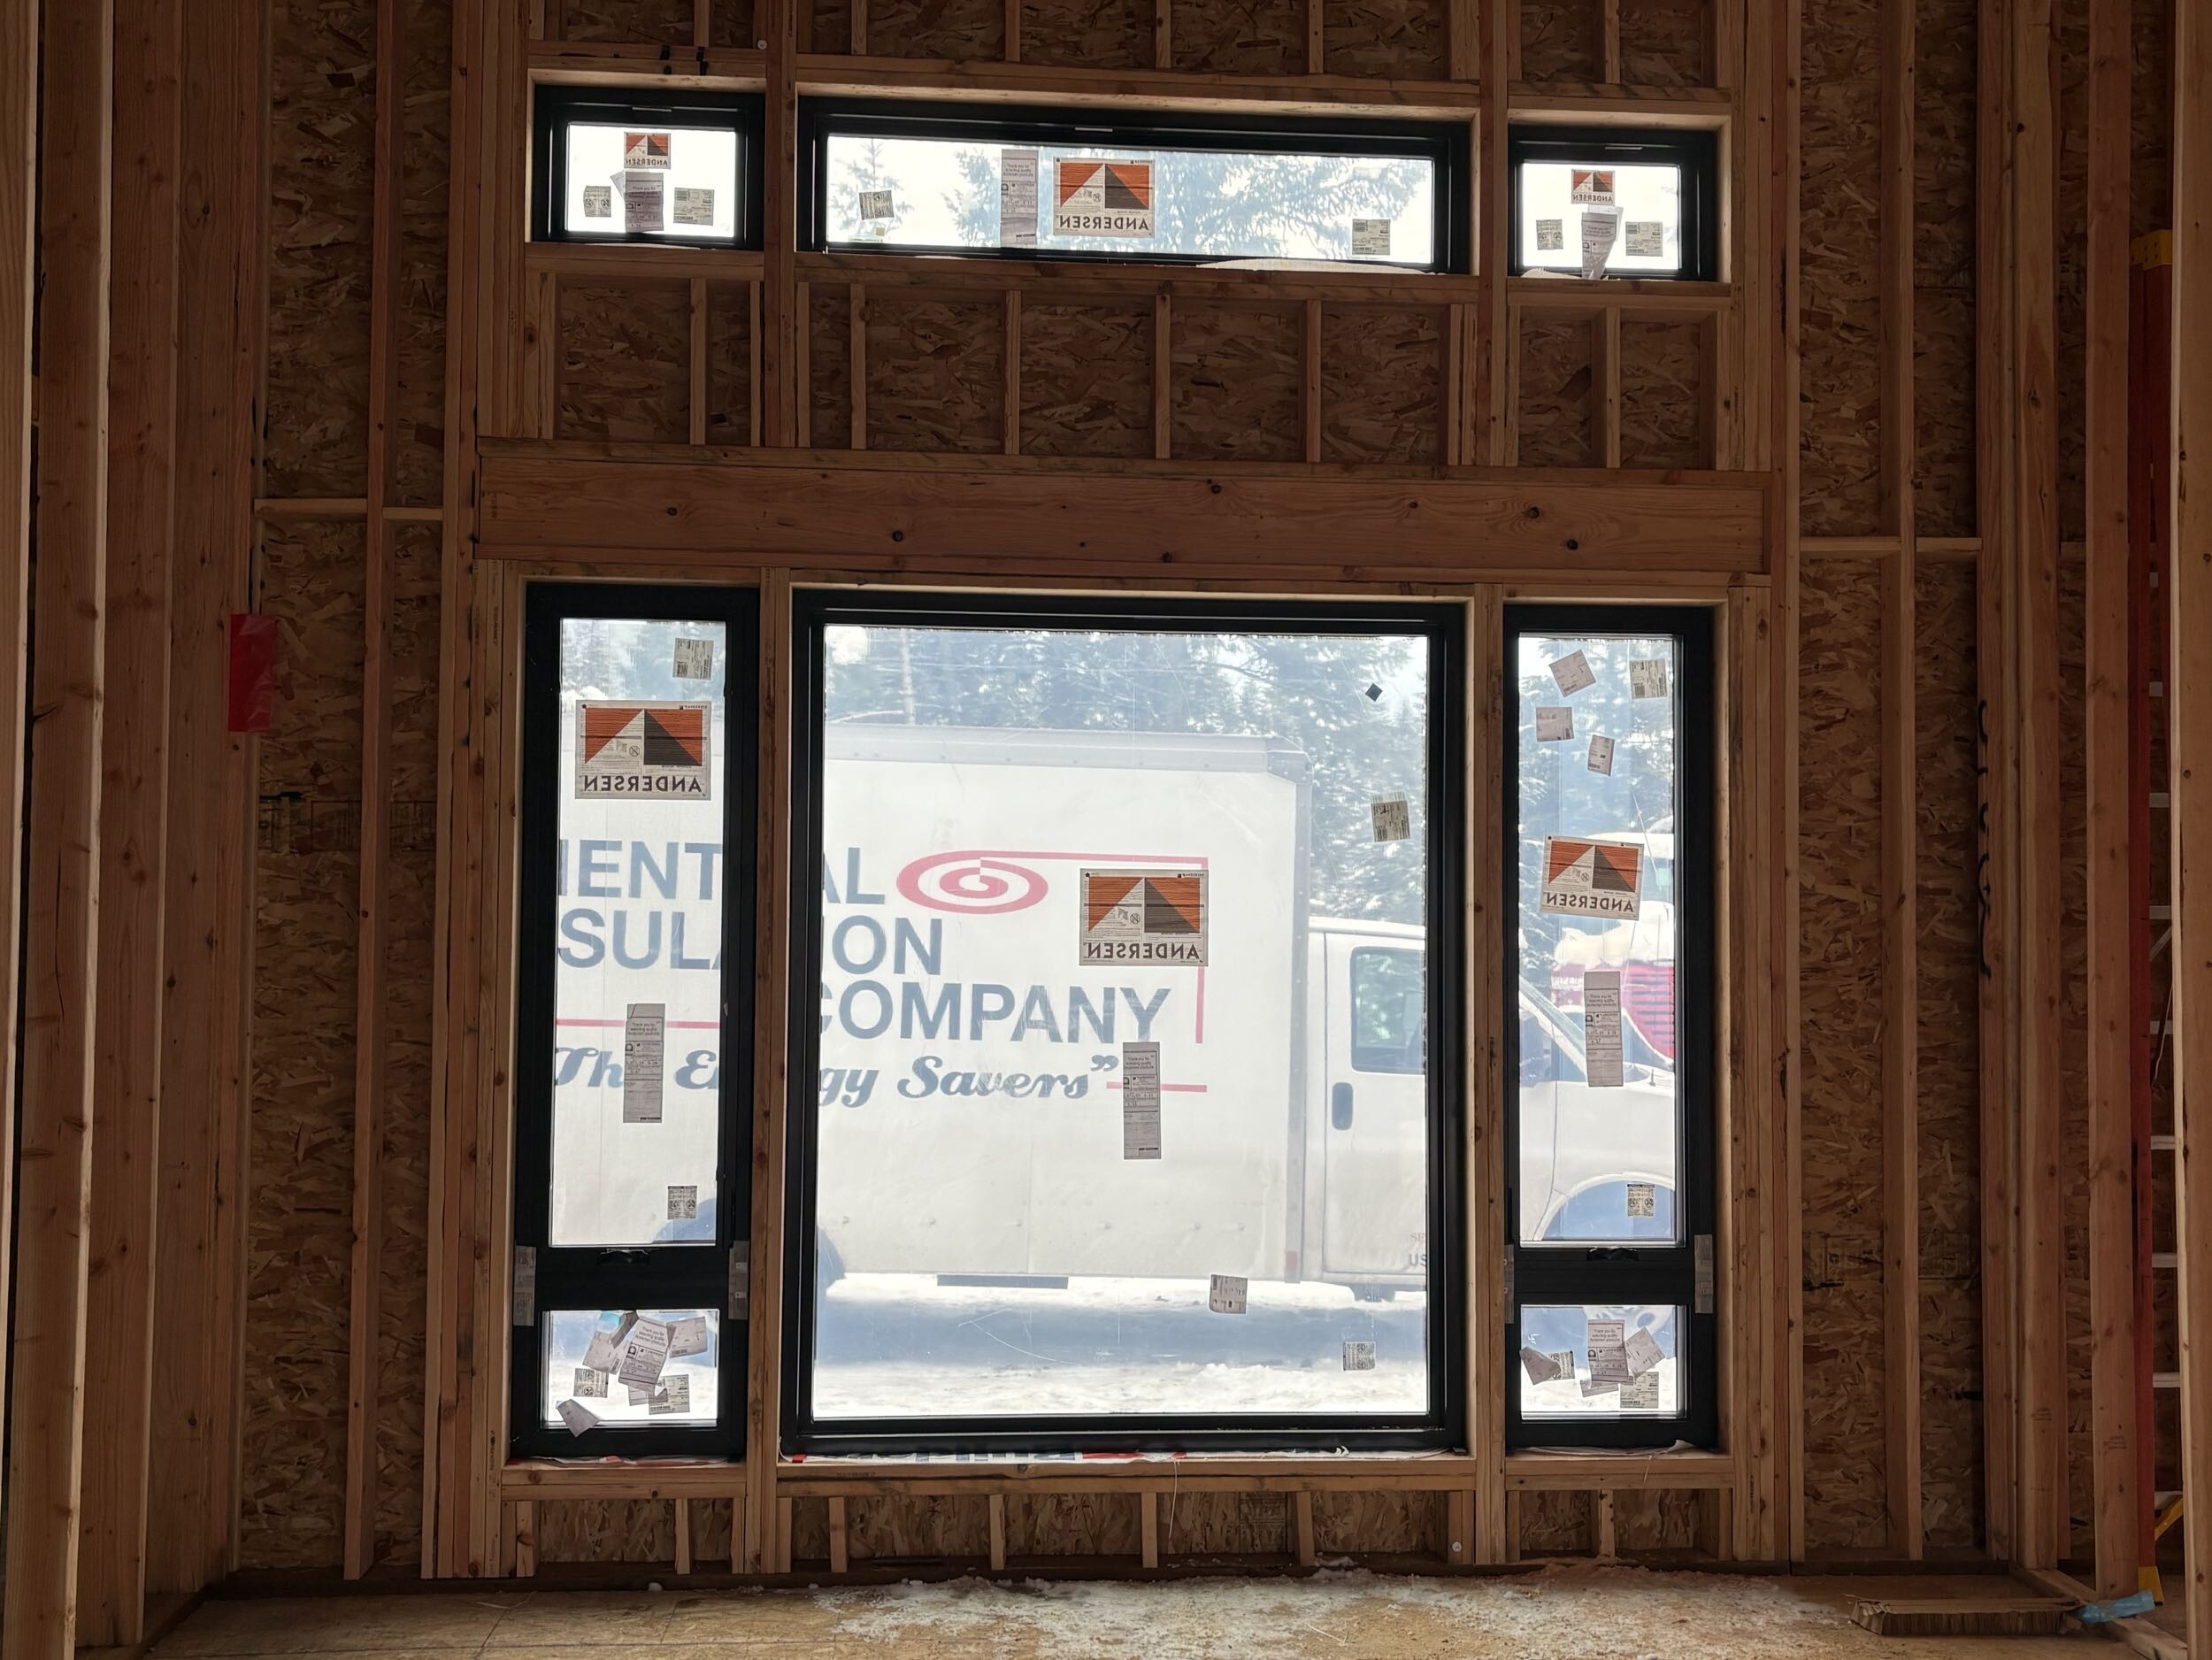
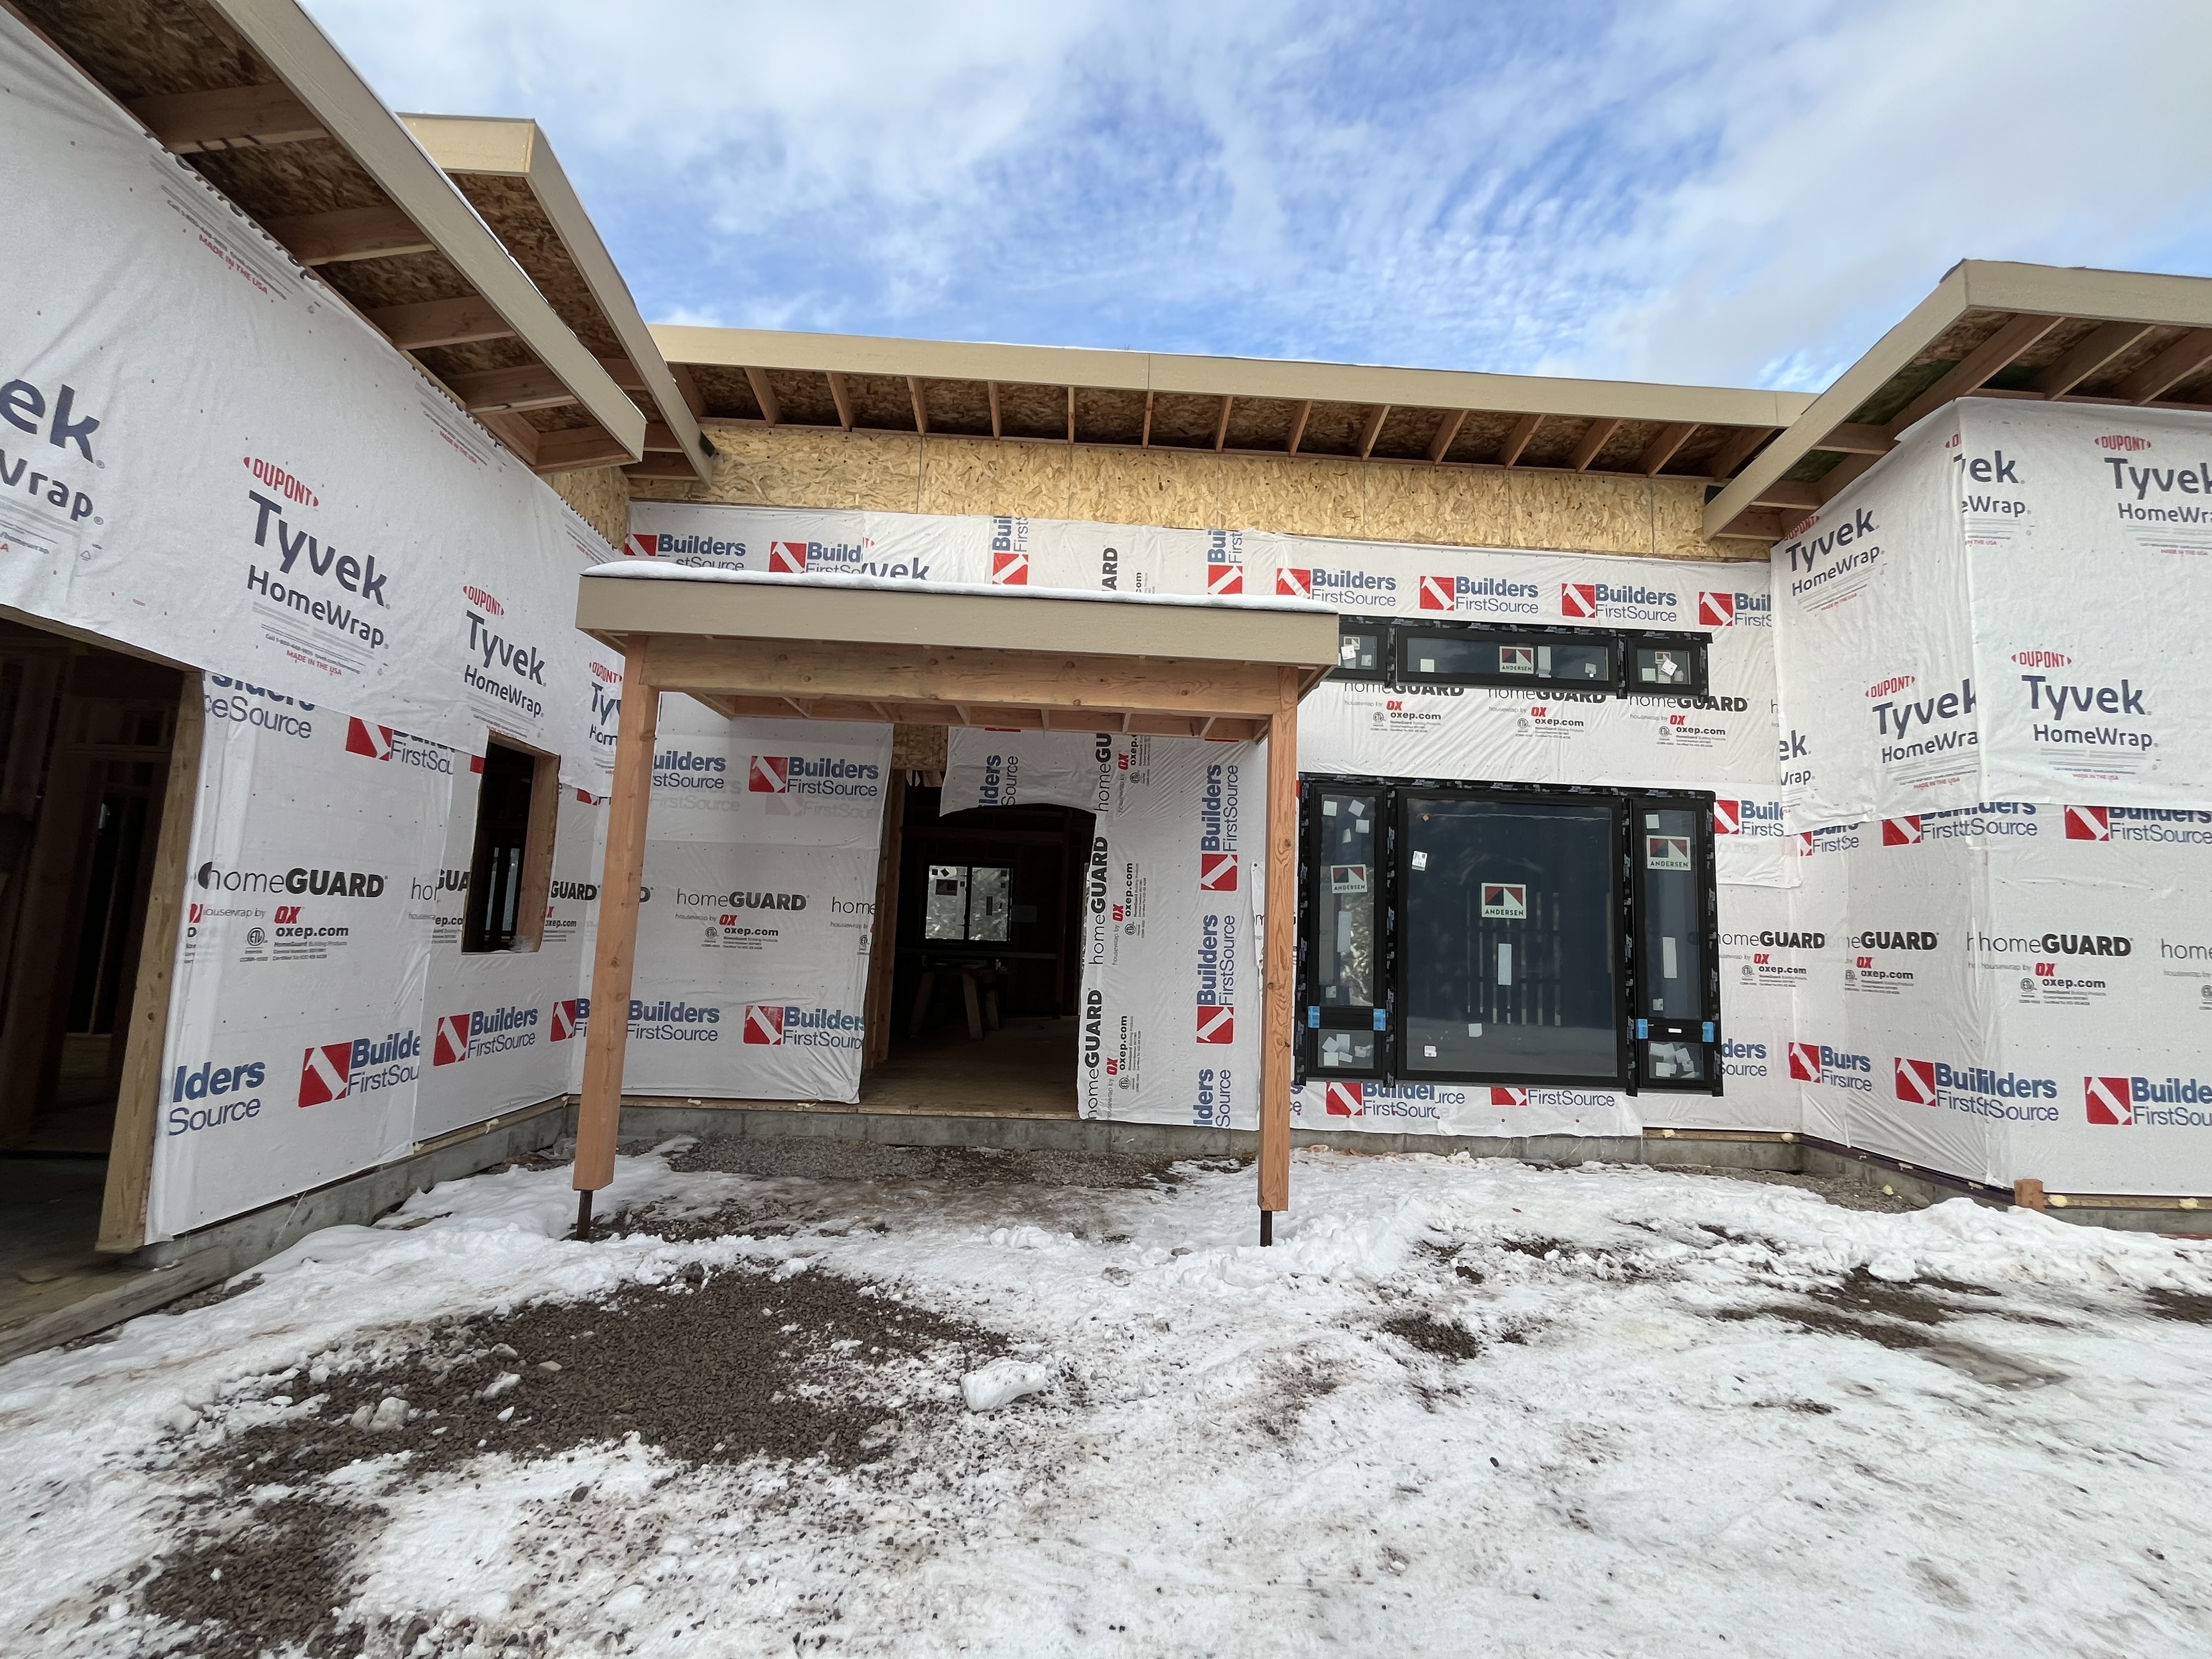


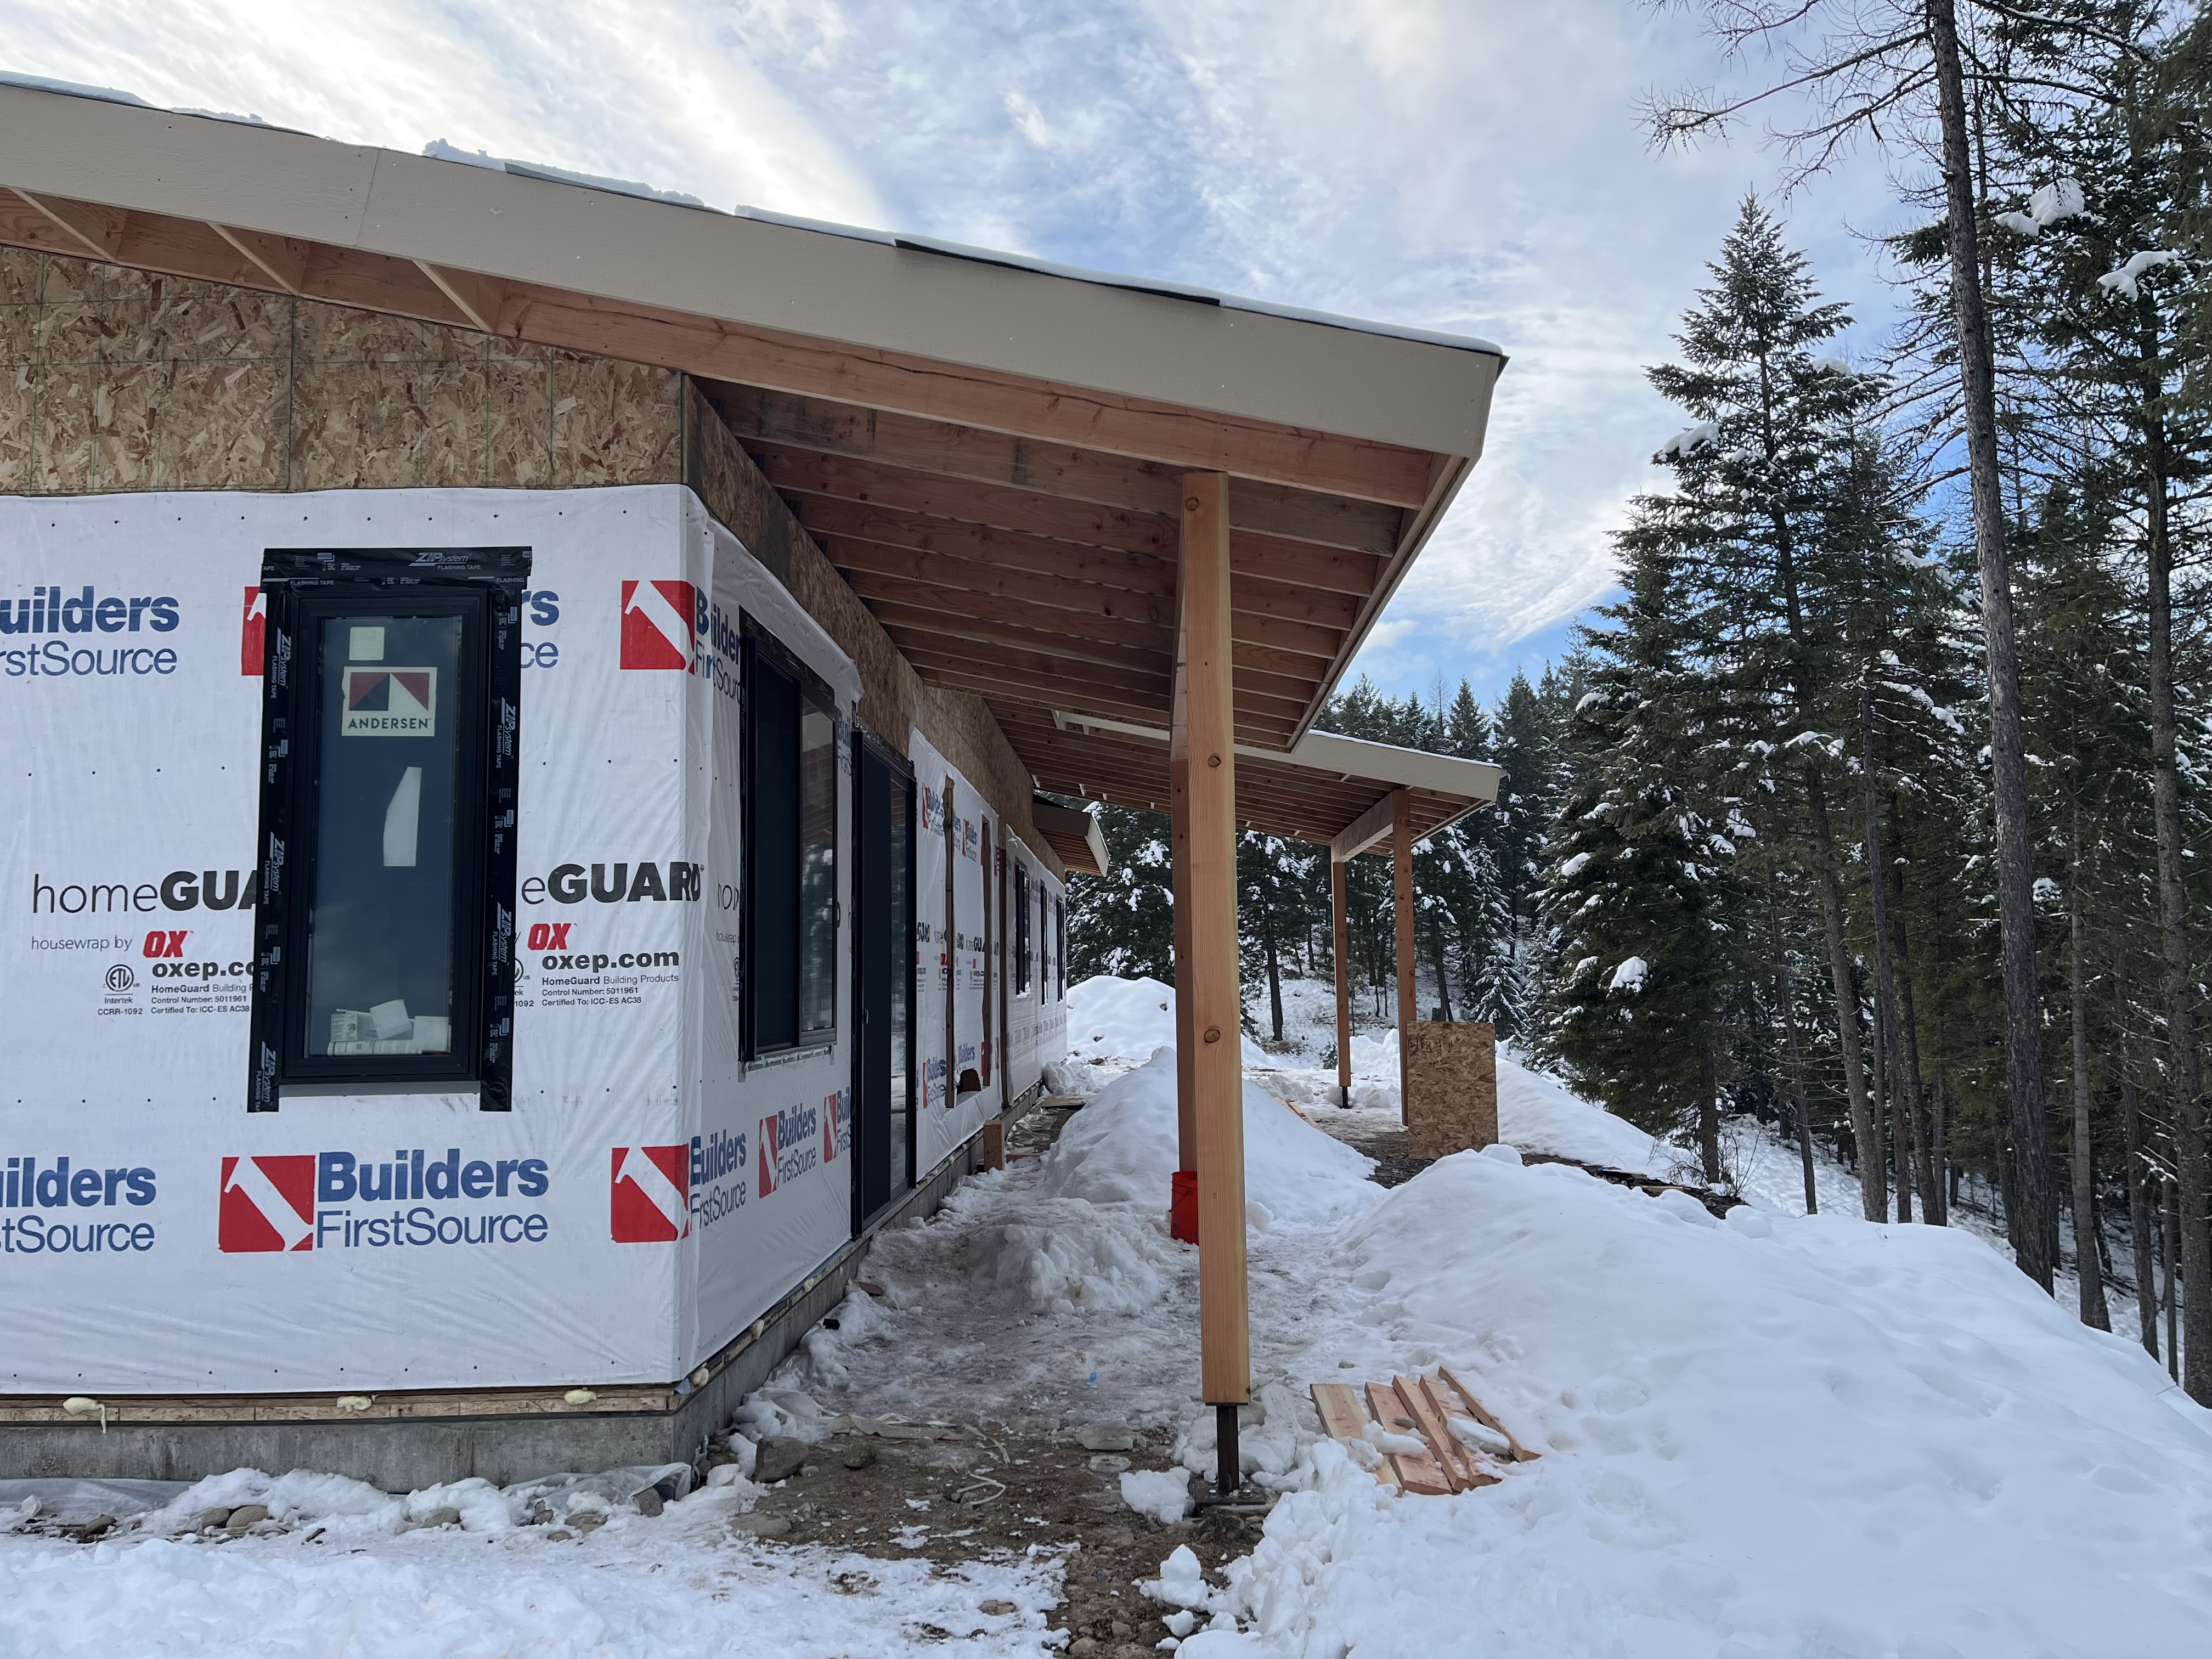
We received the window package late last week, but we were missing two windows: the large living room and laundry room windows. We saw and approved the order, so we know the builder ordered all the windows. It only took a day or two to get the large living room window, but the laundry room window is on back order, so it will be covered until it comes in towards the end of February.
I’ve read that black windows are more expensive, so we were happy to find out they were the same price as white. I think their popularity has brought down the price because our windows, back door and slider were slightly under budget. I read yesterday that black windows are OUT. I cringe every time a designer insists something is out. The mid-century modern inspiration for our home is simply good design, and good design never goes out of style. We didn’t pick black windows because they’re trendy, we chose them because we like how they frame the view out the window. Our builder recommended Andersen Windows Series 100. They are a popular choice for homeowners looking for budget-friendly, high-quality windows and patio doors. Here are some key features:
- Material: Made from Fibrex® composite material, which is twice as strong and rigid as vinyl. This material is also environmentally responsible, containing 40% reclaimed wood fiber.
- Energy Efficiency: Built with weather-resistant construction to seal out drafts, wind, and water, helping to reduce heating and cooling bills.
- Durability: Available in rich, dark colors with a durable, low-maintenance finish that won’t fade, flake, blister, or peel.
- Design: Sleek profiles and contemporary style with virtually seamless corners for a cleaner look.
- Types: Available in various types including single-hung, double-hung, casement, awning, gliding, and specialty windows.
Of course, any construction material is only as good as the installer, which means they follow the manufacturer’s installation instructions. We were thrilled to see that they installed Zip tape flashing to prevent any leaks. Here’s what an inspector will look for:
Proper Installation: Ensure that the windows and doors are installed according to Andersen’s installation guides. This includes verifying that the rough opening is prepared correctly, the unit is sealed, shimmed, fastened, and flashed properly.
- Water Management: Check that the water management system is correctly installed to prevent water infiltration. This includes inspecting the flashing, house wrap, and any other water-resistant barriers.
- Sealing and Insulation: Verify that all seals and insulation are properly applied to ensure energy efficiency and prevent drafts.
- Operation: Test the operation of the windows and doors to ensure they open, close, and lock smoothly without any issues.
- Alignment and Level: Ensure that the windows and doors are properly aligned and level within the opening.
- Aesthetic Quality: Check for any cosmetic defects such as scratches, dents, or misaligned components.
- Documentation: Review any installation documentation provided by Andersen to ensure all steps were followed correctly.
For detailed instructions and a comprehensive checklist, you can refer to Andersen’s installation guides available on their website.
Finishes
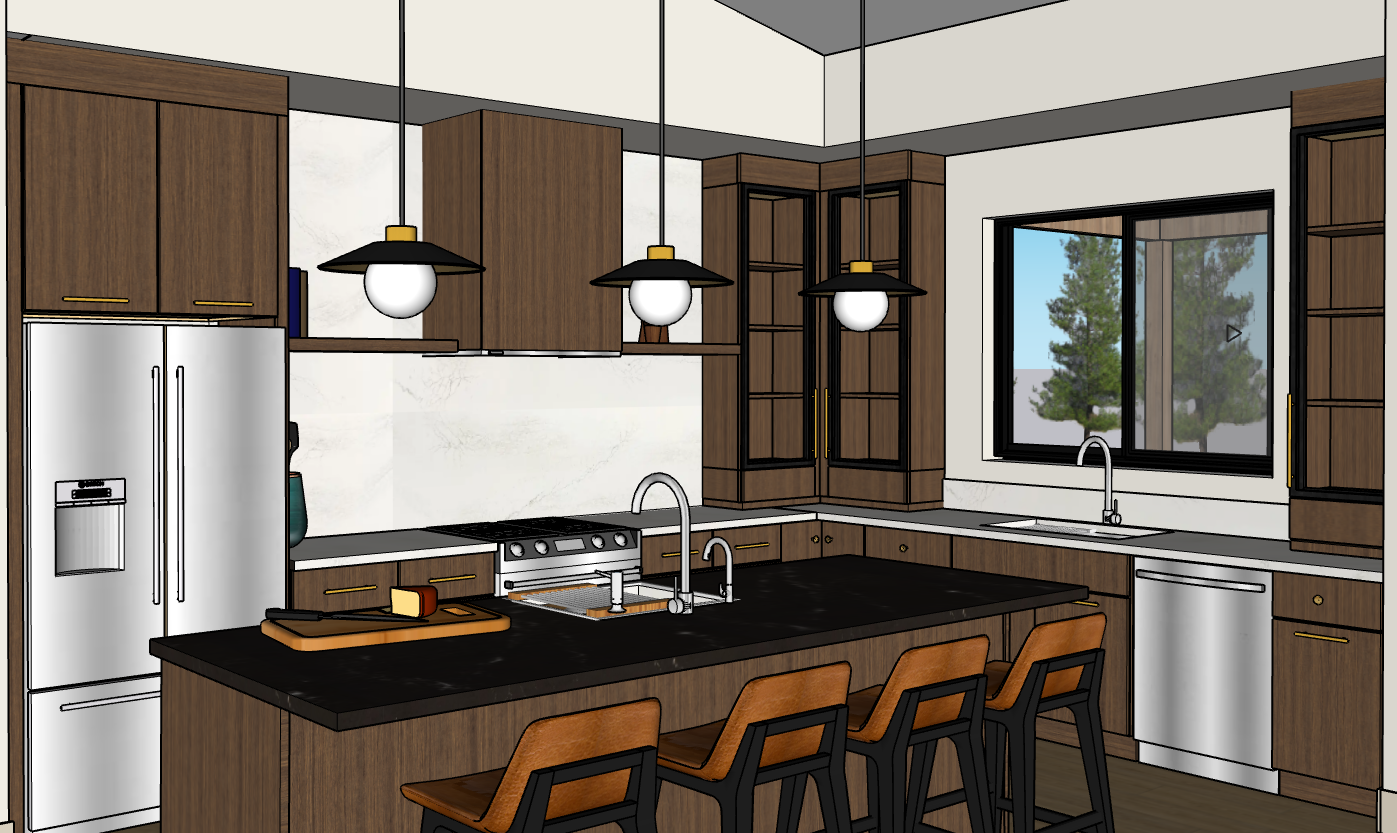
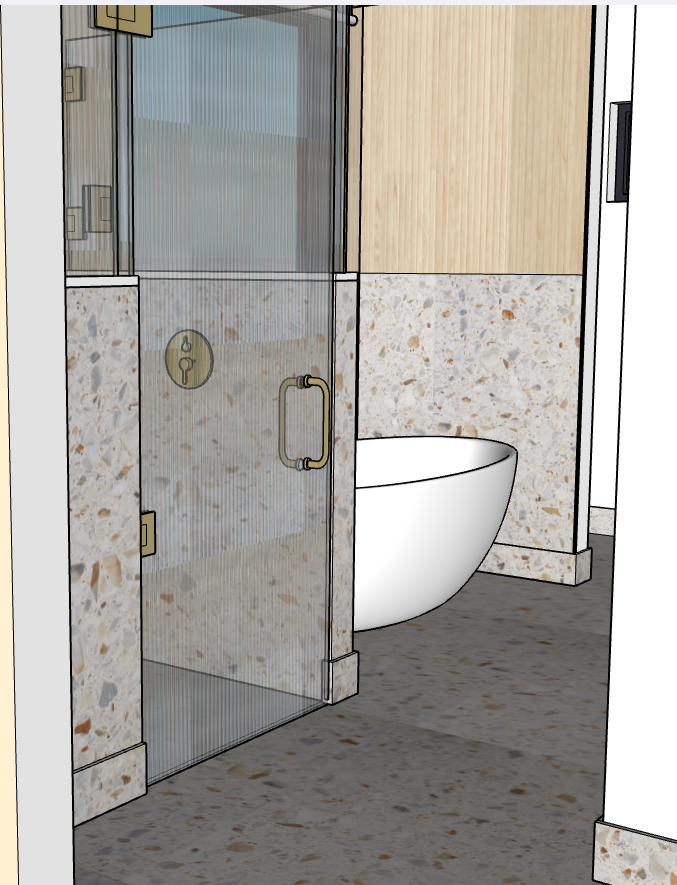
We were in Montana for our last monthly meeting, which allowed us to select our cabinets and wood floors. Y’all, we were sure we wanted mid-tone white oak cabinets before this meeting. Then boom, we’re sitting with our build team and out comes a walnut cabinet sample. People, I fell hard! I love the natural color and grain pattern of this walnut with just a matte clear coat. After looking at several different cabinet samples, the build team and I convinced Jim to get on board with the walnut. We are thrilled with our choice to go with DeWils Fine Cabinetry. The walnut is a bit darker than we first imagined, but it is just gorgeous and perfect for our mid-century modern inspired home.

We’ve gone back and forth with our flooring options, including luxury vinyl planks, solid hardwood, and engineered hardwood. We have LVP now and it is so easy to clean, but it’s not indestructible. We decided on hardwood because we want natural materials. Of course, wood floors, whether engineered or solid will get scratches or dings, but we’ll see wood instead of plastic under those imperfections. We love Johnson Flooring’s engineered European hardwood floors because they are more stable and look luxurious without the hefty price tag. The Grand Chateau 7″ wide white oak floors come in lengths up to 6′ and we love the warm brown color in the Alswick color.
Learn more about these selections in the post below:
If you made it this far, drop me a hello in the comments. Be sure to subscribe below to never miss an update and check out the 80+ other posts I’ve done to help you create indoor and outdoor spaces that are perfect for you. I also share many of our travel adventures, so they are included too.

Leave a comment